This post explains how database update can be performed through transaction codes SE16N and SE16.
At times, there might be a situation in the test environment where we are required to perform database updates in order to manipulate or try to replicate a case in a lower environment.
Database contents in SAP can be viewed through transaction codes SE16N or SE16. This post explains how the database update can be performed for both transaction codes through debug mode.
Case 1: Transaction Code SE16
In this case, I have taken a sample example to update the VBAK table entry through debug mode.

Enter Sales Order Number

Select the entry displayed

enter '/H' in the command bar and click on ok or enter button. Then click on entering again after debugging activation to enter into debugging screen

Click on the 'Code' then display as 'SHOW' on the right side of the screen. Then we will change it to 'EDIT' as we are trying to change the table contents.
if we are required to Create or Delete entry then we have enter 'INSR' or 'DELE' instead of 'EDIT' as we do now.
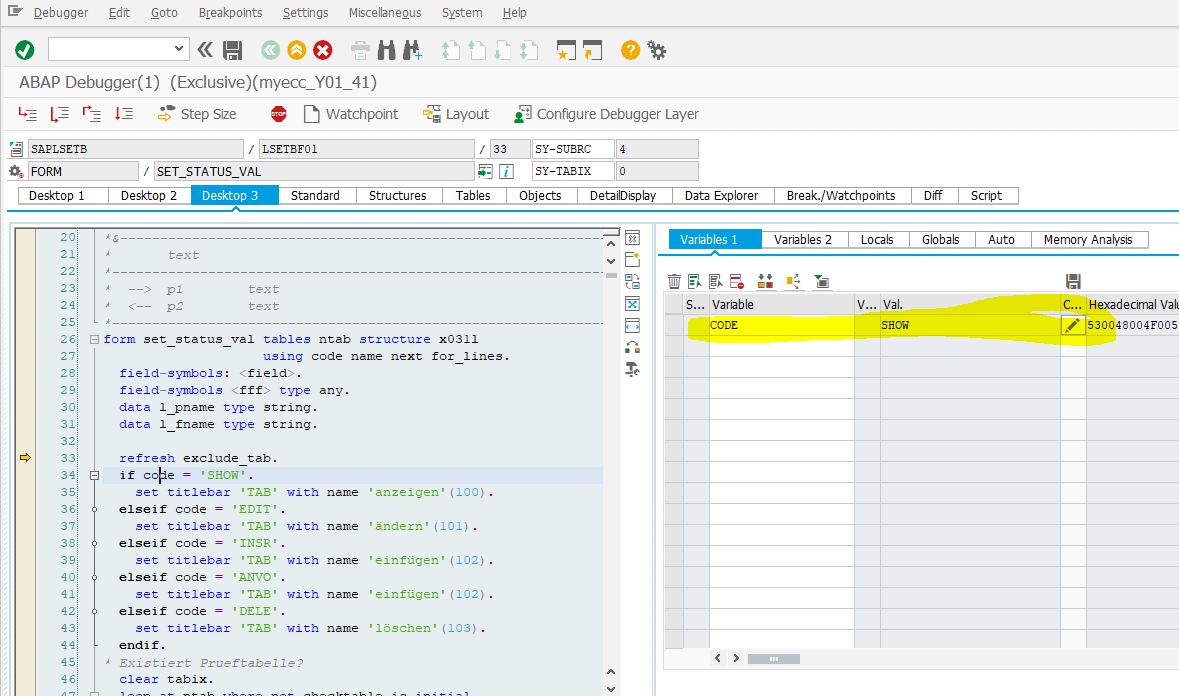

After changing the Code entry to 'EDIT' click on enter and execute. The below screen with table entries enabled for changing will be displayed.

Change the required entry and click on save.

Case 2: Transaction Code SE16N
In this case, I have taken a sample example to update the VBAP table entry through debug mode.

Enter sample sales order for which data need to be edited

enter '/H' in the command bar and click on enter or OK button. Then the message with 'Debugging mode will be switched on' will be displayed. Click on enter again to enter into debugging screen

Similar to field 'CODE' in SE16 screen we are required to amend 'GD-SAPEDIT' and 'GD-EDIT' field to enable the change.
Click on GD-VARIANT field and change it to 'GD-SAPEDIT' and 'GD-EDIT' initial values of both will be blank

Change the values of both variables 'GD-SAPEDIT' and 'GD-EDIT' to 'X' to enable table edit and click on execute.

Table entry in EDIT mode is displayed. Through this, We can ADD/EDIT and DELETE table entry leveraging the application toolbar command buttons.

Now change the entry to the required field and save.

Thank you.
At times, there might be a situation in the test environment where we are required to perform database updates in order to manipulate or try to replicate a case in a lower environment.
Database contents in SAP can be viewed through transaction codes SE16N or SE16. This post explains how the database update can be performed for both transaction codes through debug mode.
Case 1: Transaction Code SE16
In this case, I have taken a sample example to update the VBAK table entry through debug mode.
Enter Sales Order Number
Select the entry displayed
enter '/H' in the command bar and click on ok or enter button. Then click on entering again after debugging activation to enter into debugging screen
Click on the 'Code' then display as 'SHOW' on the right side of the screen. Then we will change it to 'EDIT' as we are trying to change the table contents.
if we are required to Create or Delete entry then we have enter 'INSR' or 'DELE' instead of 'EDIT' as we do now.
After changing the Code entry to 'EDIT' click on enter and execute. The below screen with table entries enabled for changing will be displayed.
Change the required entry and click on save.
Case 2: Transaction Code SE16N
In this case, I have taken a sample example to update the VBAP table entry through debug mode.
Enter sample sales order for which data need to be edited
enter '/H' in the command bar and click on enter or OK button. Then the message with 'Debugging mode will be switched on' will be displayed. Click on enter again to enter into debugging screen
Similar to field 'CODE' in SE16 screen we are required to amend 'GD-SAPEDIT' and 'GD-EDIT' field to enable the change.
Click on GD-VARIANT field and change it to 'GD-SAPEDIT' and 'GD-EDIT' initial values of both will be blank
Change the values of both variables 'GD-SAPEDIT' and 'GD-EDIT' to 'X' to enable table edit and click on execute.
Table entry in EDIT mode is displayed. Through this, We can ADD/EDIT and DELETE table entry leveraging the application toolbar command buttons.
Now change the entry to the required field and save.
Thank you.
Hey very nice website!! Man .. Beautiful .. Amazing .. I will bookmark your site and take the feeds also…I am happy to find a lot of useful info here in the post, we need work out more techniques in this regard, thanks for sharing. shipping container sizes and prices
ReplyDelete